Salesforce CRM
Written By Lauri Eurén
Last updated 30 days ago
The Salesforce integration imports your Salesforce Opportunities into Operating and creates a linked Project for each one in tentative status, so you can plan resources before a deal closes. It also imports the related Accounts as Clients and opportunity owners as Project owners. Once set up, matching opportunities sync into Operating automatically. This article is for the Salesforce administrator and the Operating admin setting up the connection.
Salesforce takes a few more steps than the HubSpot and Pipedrive integrations: it runs through a managed package, so there’s a one-time installation in Salesforce before you connect from Operating. You only do this once per org.
Before you begin
You are a Salesforce administrator (needed for the one-time package install).
You know which org you’re connecting: Production or Sandbox.
You have a stable Salesforce user to connect with — ideally an admin or dedicated integration user. This user keeps the connection authenticated over time, so avoid a personal account that might later be deactivated.
You have the manage integration and data import permission for your user in Operating.
Step 1: Install the Operating package in Salesforce (one-time, admin)
Operating syncs with Salesforce through a managed package you install once in your org.
Sign in to Salesforce as an administrator.
In the same browser, open the package install URL for your org. It’s your org’s base (My Domain) URL followed by
/packaging/installPackage.apexp?p0=04tav0000019c5VAAQ:https://<your-salesforce-domain>/packaging/installPackage.apexp?p0=04tav0000019c5VAAQ
Production example:
https://yourcompany.lightning.force.com/packaging/installPackage.apexp?p0=04tav0000019c5VAAQSandbox example:
https://yourcompany--sandbox.sandbox.lightning.force.com/packaging/installPackage.apexp?p0=04tav0000019c5VAAQ
The path and package id are always the same — only the domain changes to match your org.
On the install screen, choose Install for Admins Only (sufficient, since you connect as an admin).
Salesforce shows a notice that this is a non-AppExchange application. Tick the acknowledgment checkbox and click Install.
When the package shows as installed, continue to Step 2.
Step 2: Connect Salesforce from Operating
In Operating, go to Settings → Integrations and open Salesforce.
Choose the environment that matches your org — Production or Sandbox.
Click Connect Salesforce. You’ll be taken to Salesforce to sign in and authorize — sign in as your integration user.
After you authorize, Operating returns you to the integration page and runs an initial import.
Step 3: Select record types and stages
Salesforce opportunities are grouped by record type (the Salesforce equivalent of a pipeline). Choose the record types you want to import from, then, for each one, select which opportunity stages should create a Project in Operating. An opportunity is imported when it reaches one of the selected stages, unless it’s excluded by your filters. You must select at least one stage.
Step 4: Preview and filter opportunities
A preview list shows the opportunities that currently match your selection. Add filters on opportunity fields to narrow the import to only the opportunities you want.
Step 5: Map fields
Opportunity → Project. Opportunities are linked to both Projects and CRM deals in Operating. Default fields such as name, owner, amount, probability, and close date map automatically; optional fields like project start and end date, site, billing type, groups, and tags can be mapped manually.
Opportunity amount → Budget. You can map the opportunity amount (or another field) to a project Budget, created in the deal’s currency.
Account → Client. Salesforce Accounts are linked to Clients in Operating. The account name maps by default; you can map additional fields, including Client tags.
CRM deals are stored in Operating as read-only references to the Salesforce opportunity — useful for grouping and filtering data in views, but not editable in Operating.
Step 6: Turn on automatic sync
In Other settings, generate the webhook token. This configures the Operating package in your Salesforce org to send change notifications back to Operating, so matching opportunities sync automatically. The connecting Salesforce user needs permission to update custom settings for this to work.
You can also control what stays in sync after the initial import:
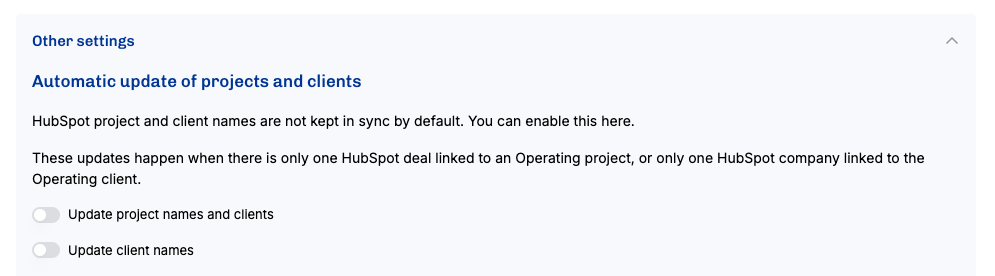
Project properties and Client properties are kept in sync by default; you can turn each off.
Budget properties are not synced by default — enable this if you want budget changes in Salesforce to flow into Operating.
Project owner and description are never overwritten after the initial import, so anything you add in Operating is safe. (Owner may be filled in later if it was still empty.)
Automatic updates only apply when there’s a single Salesforce opportunity linked to a Project, or a single Account linked to a Client.
Key functionality
Opportunities import as tentative Projects, so you can plan before a deal closes.
Automatic sync through the Operating package — no manual refresh.
Accounts become Clients, and opportunity owners become Project owners (a Person is created if the owner doesn’t exist in Operating yet).
Sync guardrails: one-to-one links only, and protected fields (owner, description) are never overwritten.
Sync Companies and Opportunity Owners
Accounts associated with imported opportunities are also brought into Operating keeping client records aligned. The integration only imports companies from Salesforce when a deal for them is imported.
Opportunity owners (Salesforce users assigned to opportunities) are imported as Project Owners, ensuring clear visibility into account ownership within your resource planning. If the Opportunity Owner is not yet a person in Operating, a new person will be created upon syncing the deal.
Optional: Project & Client name sync
You can choose to keep project names and client names in sync with HubSpot. If enabled, any updates to a deal or company name in HubSpot will automatically update the corresponding project and client in Operating, reducing manual data entry, as long as there is only one deal associated to a given project, or only one company associated with a given organization.