How to start using Operating for time tracking
Start tracking time where you already plan time. If you're interested in the timesheet functionality, drop us a message to hello@operating.app and we can give you trial access.
Written By Matti Parviainen
Last updated 20 days ago
Before You Start: Key Setup Considerations
Take time to make the following decisions up front — it will make rollout much smoother.
1. Employee Information Management
Decide where you manage employment start and end dates:
Do you manage employee lifecycle in Operating?
Or is this handled via an external HRIS?
Why it matters: This affects how Operating tracks availability and time off.
2. Time Off Configuration
Ask yourself:
Will time off be tracked in Operating or elsewhere?
Do you have an approval process?
If yes: Should Operating show tentative time off before it’s approved, and confirmed time off once approved?
Types of Time Off to Consider:
Be specific from the beginning. Here are examples:
Annual leave (paid)
Flex leave
Unpaid leave
Sick leave
Parental leave
Long-term absence
Tip: Specific categories help with future reporting and historical audits.
Set up Time Off categories in Operating
Go to Settings → Time Tracking → Time Off
Add and label each type of leave you plan to track. The category names will show up similar to project tasks in the Time off “project”.
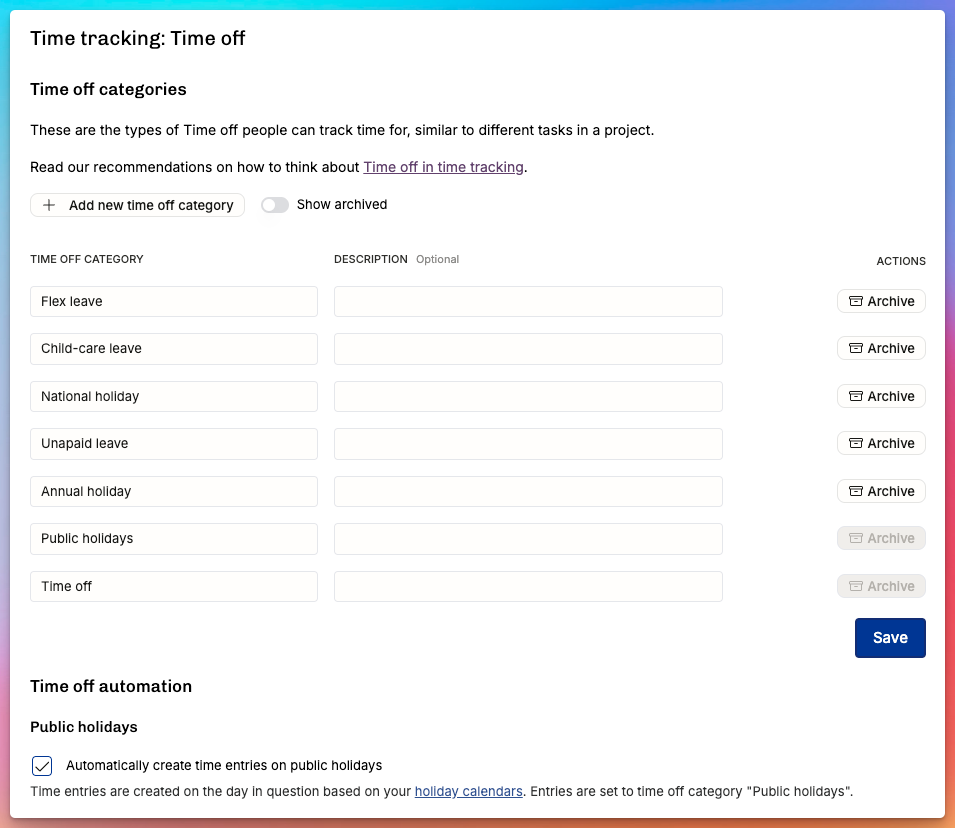
Public Holidays
Do you want Operating to automatically create full-day time entries on the days when the person has a public holidays? This is handy, and if someone ends up doing work on a public holiday, they can edit their time entries in Hours as per usual.
3. Tasks and Task Lists
Tasks are what people log their time against. Decide:
Which tasks should exist in the first place?
Do you want to reuse task lists across multiple projects?
Which tasks should exist per project?
If a project has very specific tracking requirements, use project-specific tasks.
Set up tasks
Create tasks for projects in settings → time tracking → tasks
You can choose a name and a description for the task, and if the task is billable by default or not
Create task lists
Create standardized task lists in:
Settings → Time Tracking → TasksTasks can be marked as billable or non-billable, per project.
Assign tasks to a project
Go to the Project Details Page → Tasks
Add tasks or apply an existing task list
Click each task to set billable status

Use project-specific tasks when necessary
Do this when the client wants very detailed breakdown of where the time went:
4. Define projects that anyone can track time for
If you have a handful of projects, for example for internal hours spent on training, internal meetings, sales, etc. – use this toggle in the Project Details page (in the Time tracking section) to allow it for anyone.

If you’d like to allow anyone to track time to any project they can see, then simply allow it in Permissions > Time entries:

Ready to Roll Out?
Once you’ve:
Set your task structure
Decided on leave handling
Defined your time tracking rules
Have people assigned to right projects – or allow free time tracking for any project
...you’re ready to enable time tracking for your team.
Decide a hard cut-off date (e.g. 1st of November 2025) after which all time tracking happens in Operating. We’ll help you make sure that anything before that is captured from outside systems and no longer edited in Operating – and vice versa: everything should be in Operating after the cut-off.
Next Steps
Add team members
Share guidance on how to log time
Set expectations: billable vs. non-billable, required notes, deadlines
Review time entries regularly (e.g. via Time Entries in Directory or Project details)
Consider adding Approval flows for Time entries.
If your company follows it, enable the Time Balance setting and set the initial balance for each person (e.g. from the People Horizon → Display → Columns: Time Balance).
If you have lots of old time entries that you’ve invoiced outside of Operating, make sure to set their status to “invoiced” using the Directory:

Time off
Where you manage Time Off: Operating or somewhere else
Do you have an approval process or not? Should unapproved Time Off show up in Operating as tentative and approved as confirmed, for example?
What types of Time Off do you want to track? How specific do you want to be?
Annual leave or other Paid Time Off, Flex leave, Unpaid leave, Sick leave, Parental leave, or other longer-term absences?
In our experience, it’s better to be quite specific about these, you might have reporting requirements later on and it’s great to start collecting historical data from the beginning
Do you want public holidays to be automatically tracked as “100% of working time on the day of the holiday” or not?
If you choose to manage time off fully in Operating, navigate to settings → time tracking → time off and create the tasks you want to use.
Tasks and task lists
Navigate to Settings → Time Tracking → Tasks to start adding tasks on projects.
Do you need task lists that can be used across multiple projects?
Add tasks individually and compile them into a task list as needed.
Task lists help standardize your time-tracking practices.
Each task can be designated as billable or non-billable per project.
Add tasks on projects by navigating to the Project Details Page → Tasks
Add the task list directly on the project
Click on the task to set the task billable or non-billable
Time tracking features
See your allocation plans on top of the timesheet – make sure you’re aware of how actual hours are spent, compared to plan
Automatically see your ongoing projects in the timesheet, just pick the task and start entering hours and notes – everything is auto-saved, and the page loads super quickly
Choose either a list-based entry UI for easy “copy previous day” or a week-long timesheet. Or jump between the two as you see fit
Track time on the run as well – no need to install an app, the Hours UI works fine on any modern mobile browser → https://use.operating.app/hours
Lock timesheets / submit for manager approval before sending them over to other systems or before creating an invoice in Operating
Choose if you require a note or a task for each time entry – edit these settings here

Specify where the work was done using Sites as location information for each time entry
Gradual migration path from old time tracking tool
The above article assumes that you’re simply taking Hours into use. However, more often than not, you’re already using another app to track time. This could be Harvest, Timechimp, Toggl or any other app. Here’s a guide to help you migrate without headaches.