How to manage allocations
In Operating, work on a Project is organized into two layers: Positions and Allocations. A Position is a role a Person holds on a Project. An Allocation is a block of planned time assigned to that Position for a specific date range. One Position can have many Allocations.
Written By Matti Parviainen
Last updated About 16 hours ago
Each allocation represents a planned amount of work: a percentage of a person's time over a specific date range. This guide covers how to create, edit, split, and delete allocations.
Before you start
Allocations belong to positions. Before you can create an allocation, the project needs at least one position — either assigned to a person or left open (role only). You create positions in the project's team setup or directly on the timeline.

You'll work with allocations primarily in the timeline view (Projects or People). The timeline's expanded mode is where you create and edit allocations. Click on a person's row or a project's row to expand it.
Create an allocation
Navigate to the Projects or People timeline.
Click on the relevant row to expand it.
In the expanded view, you'll see the position rows. Click and drag on the timeline to create a new allocation bar for that position.
A dialog appears where you can set:
Start date and end date
Percentage — how much of the person's working time this allocation represents (e.g., 100% for full-time, 50% for half-time)
Status — confirmed or tentative
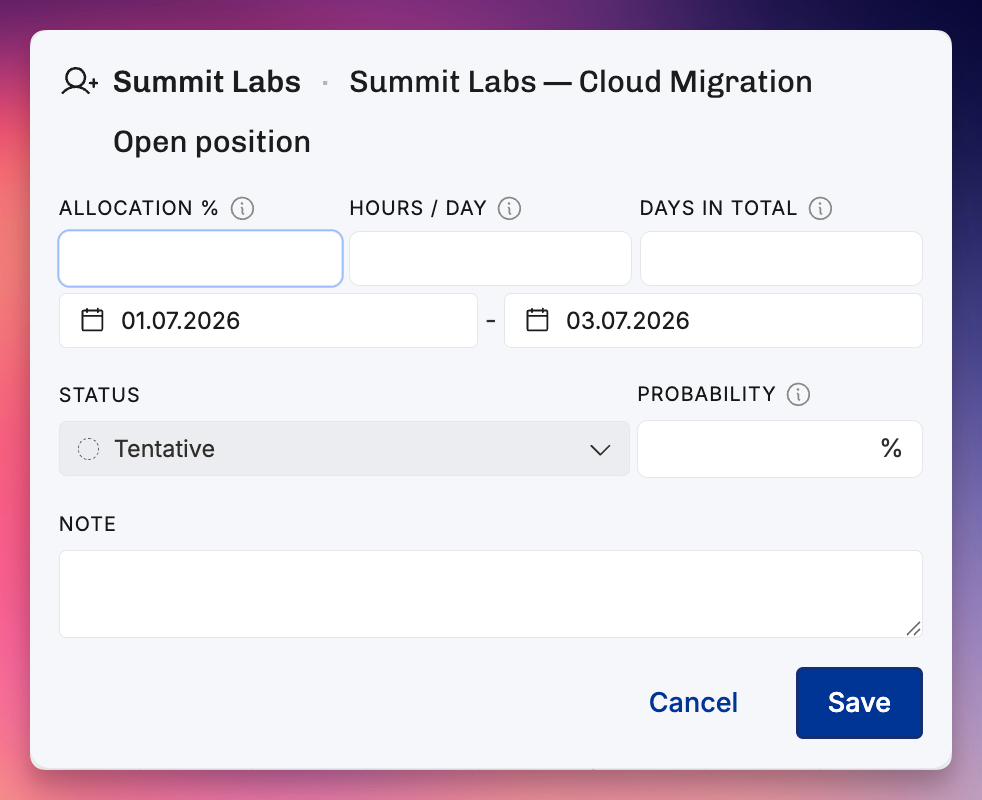
The allocation bar appears on the timeline. Its width represents the date range, and the color indicates the status (confirmed or tentative).
Tips for creating allocations
You don't need to fill in every field immediately. Allocations without dates or percentages are valid — you can refine them later as plans solidify.
If the position doesn't have a person assigned yet (an open position with only a role), the allocation still contributes to planned revenue and cost calculations based on the role's rate card entry.
You can create multiple allocations on the same position. For example, a person might be allocated at 100% for three months, then 50% for the following two months. Each period is a separate allocation.
Edit an allocation
Change dates by dragging
In the expanded timeline view, hover over the edge of an allocation bar. Your cursor changes to a resize handle. Drag left or right to shorten or extend the allocation's date range.
Change dates, percentage, or status in the dialog
Click on an allocation bar to open its detail dialog. From here you can modify:
Start and end dates — type specific dates or use the date picker.
Percentage — enter a new value. Common values are 25%, 50%, 75%, and 100%, but you can use any value.
Status — toggle between confirmed and tentative.
Click Save to apply your changes. (Dragging or resizing the bar directly on the Timeline saves immediately, no dialog.)
Move an allocation
Drag an allocation bar along the timeline to shift its entire date range forward or backward without changing its duration or percentage.
Confirmed vs. tentative
Every allocation has a status: confirmed or tentative.
Confirmed means the work is committed. The person is expected to do this work. Confirmed allocations appear in reports as reliable planned data.
Tentative means the work is planned but not yet locked in. This is typical for projects still in the sales pipeline or staffing plans that haven't been finalized.
Both confirmed and tentative allocations contribute to planned values (hours, revenue, cost) in reports. You can filter reports by status to isolate one or the other.
How status interacts with project status
When a project is tentative, all allocations within it are automatically tentative — regardless of their individual status setting.
When you confirm a project, all of its allocations are confirmed.
After a project is confirmed, you can still add new tentative allocations to it (e.g., a potential project extension for one or more positions).
This means individual allocation status only matters when the project itself is already confirmed. On tentative projects, the project-level status overrides everything.
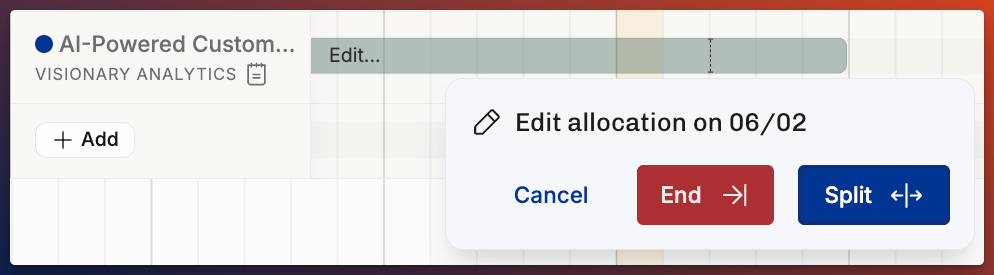
Split an allocation
Sometimes an allocation needs to be divided — for example, when a person's intensity changes partway through a project.
To split an allocation, hover over its bar on the Timeline and click in the split zone (near either edge) to open the Split popover, then click Split — Operating divides it into two allocations at that date.
Delete an allocation
Click on the allocation bar to open its dialog, then click Delete and confirm in the prompt. The allocation is permanently removed — allocations are deleted, not archived.
Deleting an allocation removes it from all planned values in reports. If the allocation was in the past and time entries exist for that period, the time entries are not affected — only the planned side of the comparison disappears.
Working with multiple allocations
Same person, multiple projects
A person can have positions (and therefore allocations) across multiple projects. Their total allocation percentage across all projects is visible in the People timeline as a summary bar. If the total exceeds 100%, the person is considered overbooked.
Operating does not prevent overbooking. This is intentional — tentative plans for multiple pipeline projects will often add up to more than 100%, and that's realistic. Not all deals will be won. The staffing team resolves overbooking when a deal is confirmed or lost.
Same person, multiple roles in one project
A person can have multiple positions in the same project if they perform different roles. Each position has its own allocations. This is useful when someone acts as both a developer and a project manager, for example, especially when the billing rates differ per role.
Allocation gaps
It's fine to have gaps between allocations on a position. A person might work on a project in March and April, take a break, and return in August. Each period is simply a separate allocation. The gap will show as unallocated time on the timeline.
How allocations affect financial calculation
Allocations are the engine behind a project's planned financials — keeping them current is what keeps planned vs. actuals and forecasting accurate.
Allocations drive the planned side of a Project's financials. Planned hours come straight from them — allocation percentage × the Person's working hours across the period (after holidays and Time off). From those hours:
Planned cost = planned hours × the Person's cost rate — on every billing type. Planned expenses add to cost too.
Planned revenue follows the hours only for time-and-materials (planned hours × the applicable billing rate, plus billable Planned expenses). For fixed-price, planned revenue comes from the Budget via the recognition method, not from allocations — so there, allocations shape cost and delivery, not revenue.
Keeping allocations current is what keeps planned vs. actuals and forecasting accurate. For the exact formulas, see How are planned revenue and planned cost calculated? and Understanding planned vs. actuals.
A deal is won — convert tentative allocations to confirmed
Update the project status from tentative to confirmed. This confirms all existing allocations.
Review each position's allocation: are the dates and percentages still accurate now that the deal is real?
If the team setup changed during the sales process, add or remove positions as needed. See How to move, reassign, or remove a position.
A deal is lost — clean up tentative allocations
You can either archive the project (which hides all tentative allocations from reports) or delete the individual allocations.
Archiving is usually cleaner — it preserves the history if the opportunity resurfaces.
A project extension is being discussed
Add new tentative allocations to the existing confirmed positions, covering the potential extension period. This way, the extension shows up in your utilization forecast without affecting the confirmed baseline.
A person's availability changes mid-project
Split the allocation at the change point. For example, if someone moves to part-time from a specific date, end the current allocation the day before and create a new allocation at the reduced percentage from that date onward.
Related articles
Projects in Operating — how to create projects and set up team positions
Statuses in Operating — how confirmed and tentative statuses work across projects, positions, and allocations
Timeline layout and settings — how to navigate and configure the timeline view