How to set up a retainer project
Set a project's billing type to Retainer, configure the fee and periods, and change the retainer later.
Written By Mikko Karjalainen
Last updated About 20 hours ago
This article shows how to set a project's billing type to Retainer, configure the retainer's fee and periods, and change the retainer later. For how a retainer earns revenue and how its periods are invoiced, see How retainers work in Operating.
Before you start
Permissions. To change the billing type, you need permission to edit the project. To configure or edit the retainer, you also need Manage rates, budgets and planned expenses for the project. A switch to or from Retainer deletes budgets or retainer periods, so it needs that permission too, and Operating refuses the save without it. See Permission sets in Operating.
Currency. The project needs a currency, which you set in Project currency on the Setup tab or in the Billing type dialog. The Edit button for the retainer shows only when the project has a currency.
No invoices yet. The billing type cannot change once the project has invoiced items.
Open project. On a completed or cancelled project, the retainer is read-only. The Edit button is unavailable, and its tooltip says This project is …, so its plan is read-only.
1. Set the billing type to Retainer
Open the project.
On the Setup tab, click Set billing type, or Edit when the project has a billing type, in the Billing type section. You can also click the billing type in the Project setup section of the Overview.
In the Billing type dialog, select Retainer in the Billing type field.
If the project has no currency, select one in the Currency field.
Click Save.
If the project already has budgets, Operating deletes them when you save, because the retainer generates the project's budgets.
2. Configure the retainer
Open the project's Setup tab. The Retainer section shows No retainer schedule configured.
Click Edit. You can also expand the project's row on the project timeline and click Edit in the Retainer row.
In the Configure retainer dialog, fill in the fields (see the list below).
Click Save. Operating shows Retainer configured and generates the retainer periods.
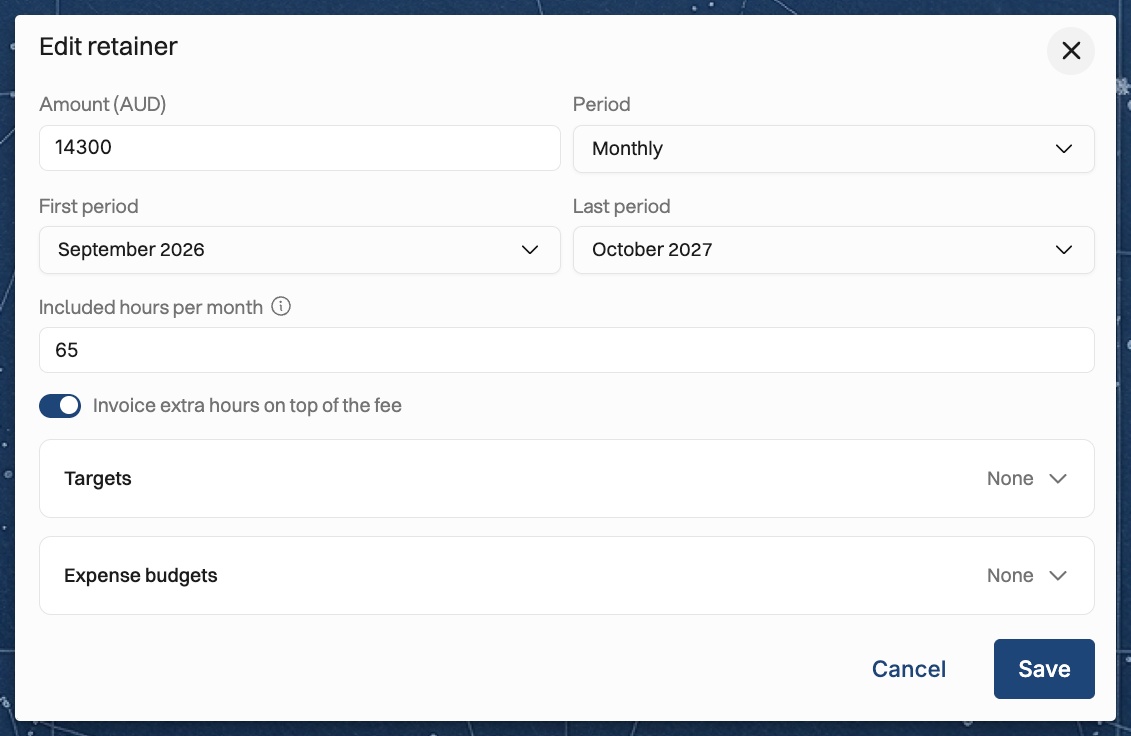
The dialog has these fields:
Amount (EUR) — the fee for each period. The label shows the project's currency. The amount must be above 0.
Period — how long each period is: Weekly, Biweekly, Monthly or Quarterly. The default is Monthly. When you change Period, Operating clears First period and Last period.
First period — the first period the retainer covers. For a monthly or quarterly retainer, pick a month or quarter, such as January 2026. For a weekly or biweekly retainer, click any day to select its Monday-to-Sunday week.
Last period — the last period the retainer covers. It cannot be before First period. On a biweekly retainer, it must end a two-week block counted from First period.
Included hours per month — the number of billable hours the fee covers in each period. The label follows the period: week, 2 weeks, month or quarter. Leave the field empty if the fee covers every hour without limit. Enter 0 if every billable hour bills as overage.
Invoice overage — shows when you fill in the included hours, and is on by default. When it is on, hours past the included hours go on invoices as overage at the project's rates. When it is off, those hours still show as overage, but they earn no revenue and are not invoiced.
Add expense budget — adds an expense budget to every period. Select a category and an amount, and click Add category for each further category. The expense budgets together cannot be more than the fee. Billable expenses are still billed on top of the fee.
- Targets — internal targets for the hours, cost, margin or hourly rate of each period. Operating copies them onto every period. See How to set targets on a Budget.
Save stays unavailable until Amount, First period and Last period are filled in and every field is valid.
What the setup generates
When you save, Operating generates one retainer period for each period from First period to Last period. Each period gets the fee, the included hours, the overage setting and the expense budgets, and is named after the calendar period it covers, such as January 2026.
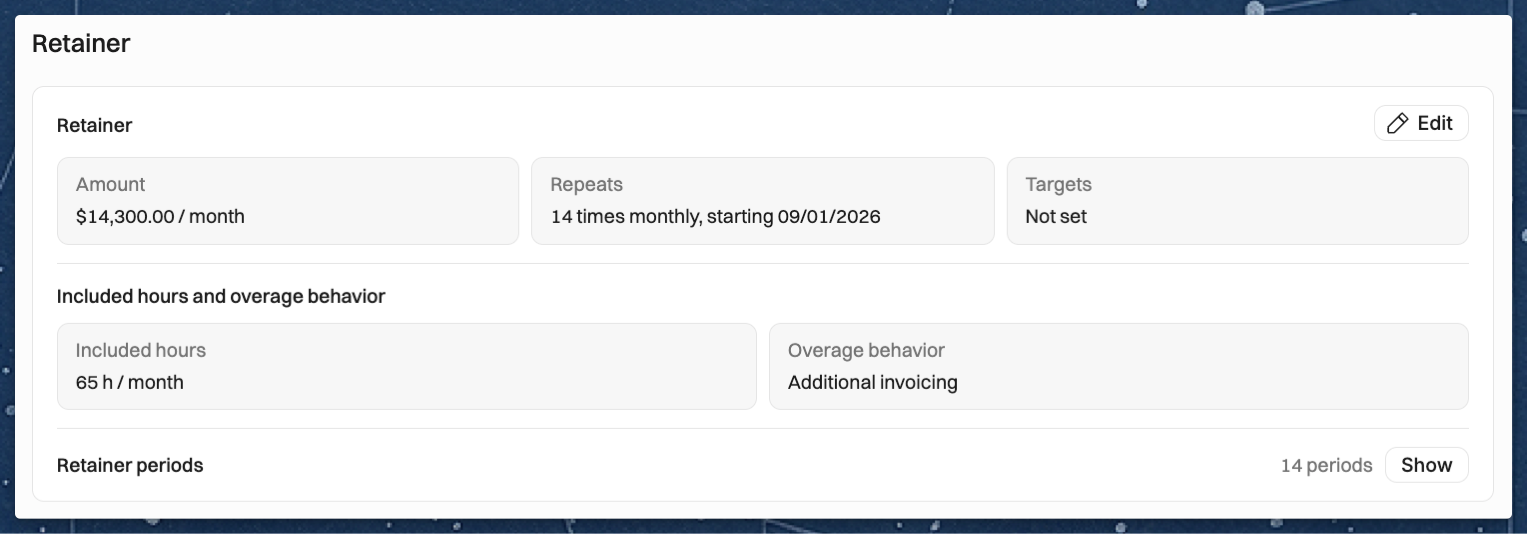
The Retainer section on the Setup tab then shows:
Amount — the fee per period, for example €5,000.00 / month.
Repeats — how many periods there are, how long each is and when the first starts, for example 12 times monthly, starting 1 Jan 2026.
Expense budgets — the total of the expense budgets per period. It shows only when the retainer has expense budgets.
Included hours and overage — the included hours, for example 40 h / month, and whether Invoice overage is Yes or No. It shows only when the retainer has included hours.
Retainer periods — how many periods there are and how many you changed by hand, for example 12 periods, 2 modified, with a Show button that lists them.
The periods also show on the project Overview, on the Status tab and as bars on the project timeline.
Edit the retainer
Open the project's Setup tab.
In the Retainer section, click Edit.
In the Edit retainer dialog, change the fields you need.
Click Save.
If you changed the fee, the included hours, Invoice overage or the expense budgets, the Apply changes to dialog asks which periods take the new terms. Select an option and click Save.
Operating shows Retainer updated, or Retainer updated from and the first period you changed, such as Retainer updated from June 2026.
The options in the Apply changes to dialog:
All periods — every period takes the new terms, including periods you changed by hand. Once a period is invoiced, the option is All uninvoiced periods, and invoiced periods keep their values.
Starting from a period — select the first period to change. That period and every later one take the new terms, and the earlier periods keep theirs. The list starts after the last invoiced period, and it selects the first period that has not started yet.
When only one option is possible, Operating saves without asking.
The dialog can show an Also overwrites: box. It lists the values that the save replaces besides the ones you changed, for example the included hours you set by hand on one period. Read it before you click Save.
What a change to the dates or the period length does:
Last period. A later Last period adds periods at the end. An earlier Last period deletes the periods after it.
Period and First period. A change to either one generates every period again, so changes you made to single periods are lost. You cannot change Period or First period once the project has invoiced items, or once the terms change partway through the retainer.
When the terms change partway through
When you apply new terms from a period on, the retainer has more than one configuration. The Retainer section on the Setup tab then changes:
The heading says which configuration it shows and its dates: Current, or Upcoming or Last when no configuration covers today.
Configuration history shows how many configurations come before and after, such as 1 earlier, 1 upcoming. Click Show to open the Configuration history dialog. It lists the dates of each configuration and marks the one the section shows as Current. The first row shows its fee and included hours. Each later row lists what it changed, such as the fee, the included hours or the targets, or reads Same terms.
In the Edit retainer dialog, Period and First period are then locked, and the dialog says The terms change partway through this retainer, so its first period and period length can't change. Click Show configurations to see the history. You can still move Last period.
Change one period
On the Setup tab, in the Retainer section, click Show next to Retainer periods.
In the Retainer periods list, click the pencil icon next to the period. You can also hover over the period's bar on the project timeline and click Edit period.
In the Edit Retainer Period dialog, change any of these:
The Period name.
The Description.
The Fee EUR (the label shows the project's currency).
The Included hours.
The Invoice overage switch.
The expense budgets.
Click Save.
If you changed the fee, the included hours, Invoice overage or the expense budgets, the Apply changes to dialog asks which periods take the change. It lists what you changed, for example Changes: Fee €5,000 → €5,500. Select an option and click Save.
The options in the Apply changes to dialog:
This period — only this period changes. It then shows as Modified in the Retainer periods list, and the other periods keep the retainer's values.
This and later periods — this period and every later one take its terms, and the earlier periods keep theirs. The option is not offered when a later period is already invoiced.
All periods — every period takes this period's terms. Once a period is invoiced, the option is All uninvoiced periods, and invoiced periods keep their values.
A change to only the name or the description saves to this period alone, without the dialog. The Also overwrites: box works the same way as in the Edit retainer dialog.
Messages when you save the retainer
These messages appear in the Configure retainer or Edit retainer dialog, under a field while you fill it in or when you click Save:
Included hours must be 0 or more — the included hours are below 0 or are not a number. Enter 0 or a larger number, or leave the field empty.
Expense category budgets cannot exceed the fee — the expense budgets together are more than Amount. Lower the expense budgets or raise the fee.
A budget schedule cannot generate more than 600 periods — the dates from First period to Last period hold more than 600 periods. Pick an earlier Last period or a longer Period.
Cannot shrink the schedule past budgets that have already been invoiced: followed by numbers — the earlier Last period would delete periods that are already invoiced. Pick a Last period on or after the last invoiced period.
The retainer cannot end before a period that has been invoiced. — the same check on a retainer whose terms change partway through. The earlier Last period would delete periods that are already invoiced. Pick a Last period on or after the last invoiced period.
Change a project to or from retainer
You change the billing type in the Billing type dialog, the same way as in step 1. You can do this only before the project has invoiced items.
To retainer. Operating deletes the project's budgets when you save. Then configure the retainer as in step 2.
From retainer to another billing type. Operating deletes the retainer's schedule and every retainer period it generated, with their fees, included hours and expense budgets. Then add the budgets that the billing type you chose needs.
These messages appear in the Billing type dialog when you select a billing type:
Billing type cannot be changed after the project has been invoiced. Consider creating a new project instead. — the project has invoiced items, so the billing type is locked. Create a separate project for the work that follows.
This billing type change will delete any budgets you've configured. — you selected Retainer on a project that has budgets. When you click Save, Operating deletes those budgets. Note their amounts first if you need them.
This billing type change will clear your retainer settings. — you selected another billing type on a retainer project. When you click Save, Operating deletes the retainer's schedule and every retainer period it generated.
Billing type change may have a significant impact on how the project should be invoiced. Please revise the invoicing schedule if you change the billing type. — the project has its own invoicing schedule. After you save, check that the invoicing schedule still fits the billing type.
Related articles
Was this helpful?
Still need help? Ask the team